
Post

Installing and Using NSSM (Non-Sucking Service Manager) on Windows
What is NSSM?
NSSM (Non-Sucking Service Manager) is a free tool that allows you to install and manage any application as a Windows service. This is particularly useful for applications that don't natively support running as a service, ensuring they start automatically when your system boots and continue running in the background.
Downloading NSSM
- Visit the official NSSM website: https://nssm.cc/
- Download the latest stable release.
- Extract the downloaded ZIP file to a directory of your choice (e.g.,
C:\nssm).
Adding NSSM to Your PATH (Recommended)
Adding NSSM to your system's PATH environment variable allows you to run nssm commands from any command prompt window.
- Search for "Environment Variables" in the Windows Start menu and select "Edit the system environment variables."

- In the "System Properties" window, click the "Environment Variables..." button.
- In the "System variables" section, find the "Path" variable and click "Edit."
- Click "New" and add the path to the directory where you extracted NSSM (e.g.,
C:\nssm). - Click "OK" on all open windows to save the changes.
- Open a new command prompt window and type
nssm --version. If NSSM is correctly added to your PATH, you should see the version information.
Using NSSM: Installing a Service
- Open a command prompt as administrator.
- Type
nssm install <service_name>and press Enter. Replace<service_name>with the name you want to give to your service. - A GUI will appear, allowing you to configure the service.
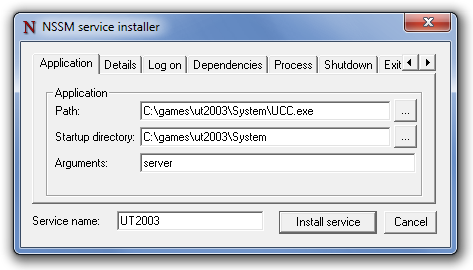
- In the "Path" field, enter the full path to the application's executable.
- In the "Startup directory" field, enter the directory containing the executable.
- Configure any other options as needed, such as "Arguments," "I/O," or "Details."
- Click "Install service."
Example:
nssm install MyGrainRelay
Conclusion
Congratulations, you now have NSSM installed and know the basics of using it to manage windows services. Check my profile for more technical guides on various topics, and stay tuned for more guides.
0
0
0
0